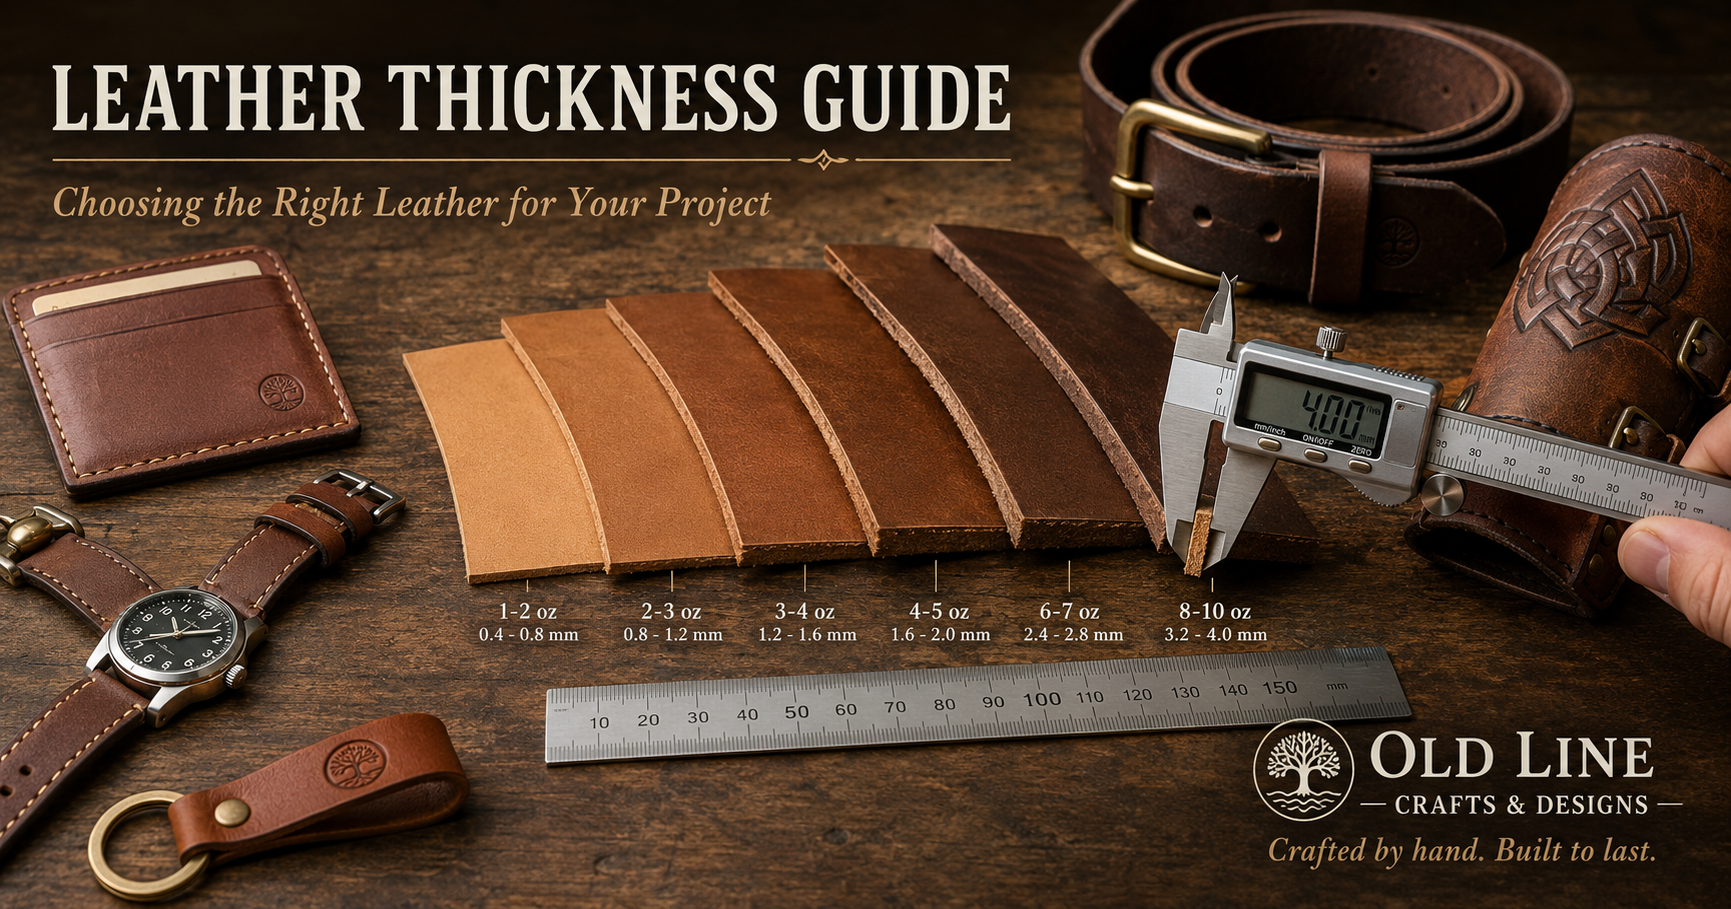
One of the first questions new leatherworkers encounter is also one of the most important:
What thickness of leather should I use?
Buy leather that is too thin and a project that should be firm may feel floppy and weak. Buy leather that is too heavy and a wallet can become bulky, a strap may resist folding, and a detailed project can become unnecessarily difficult to assemble.
The challenge is that leather is commonly sold by weight in ounces, even though what most beginners really want to know is how thick it is.
This guide explains leather weights in straightforward terms and gives practical starting points for everything from card holders and straps to leather bracers and cosplay armor.
Understanding Leather Weight
In leathercraft, an ounce is a measurement of thickness, not the weight of the entire hide.
As a practical approximation:
1 oz leather ≈ 1/64 inch ≈ 0.4 mm thick
Because leather is a natural material, thickness varies across a hide. That is why suppliers frequently list a range such as 4–5 oz rather than one exact measurement.
Here is a useful workbench reference:
| Leather Weight | Approx. Thickness | Typical Uses |
|---|---|---|
| 2–3 oz | 0.8–1.2 mm | Wallet pockets, linings, lightweight details |
| 3–4 oz | 1.2–1.6 mm | Card holders, wallet components, small accessories |
| 4–5 oz | 1.6–2.0 mm | Wallet exteriors, pouches, light straps, general projects |
| 5–6 oz | 2.0–2.4 mm | Heavier accessories, bracers, structured projects |
| 6–7 oz | 2.4–2.8 mm | Belts, straps, heavier bracers, armor components |
| 7–8 oz | 2.8–3.2 mm | Belts, sheaths, structured armor |
| 8–9 oz | 3.2–3.6 mm | Heavy belts, sheaths, substantial armor pieces |
| 9–10 oz | 3.6–4.0 mm | Heavy-duty and rigid leather projects |
These are starting points rather than absolute rules. A design, construction method, desired flexibility, and number of leather layers can all change the ideal choice.
What Type of Leather Should a Beginner Buy?
For many traditional leathercraft projects, vegetable-tanned leather, commonly called veg-tan, is an excellent material to learn with.
It can be cut, punched, stamped, carved, dyed, burnished, wet-formed, and finished in many different ways. Current beginner guidance likewise commonly recommends vegetable-tanned leather because of its firmness, ability to accept tooling and finishing, and suitability for developing core leatherworking skills.
That versatility is particularly useful when you are learning because one piece of leather can teach you several techniques.
Chrome-tanned leather is also useful, but it tends to be softer and is often better suited to projects where flexibility is desirable, such as soft bags, garments, linings, and certain accessories.
Neither tanning method is universally “better.” The correct choice depends on what you are making.
Best Leather Thickness for Card Holders
A card holder needs enough structure to retain cards without becoming unnecessarily bulky.
For many designs, 3–4 oz vegetable-tanned leather is a useful starting point. Current leather selection references similarly place three-slot card holders around this range.
Remember that multiple layers add up quickly.
Three layers of 4 oz leather stacked together create a much thicker edge than a single 4 oz piece.
For a layered card holder, you might therefore combine:
- 3–4 oz exterior leather
- 2–3 oz pocket leather
This is one reason experienced leatherworkers often use different weights within the same project.
Best Leather Thickness for Wallets
Wallets present the same problem on a larger scale.
A beautiful piece of 8 oz leather may be excellent for a belt, but several layers of it would create an extremely bulky wallet.
A practical combination might use:
Exterior: approximately 3–5 oz
Interior pockets: approximately 2–3 oz
The exact combination depends on the design.
When evaluating a wallet pattern, think about the finished stack, not just the thickness of each individual piece.
Best Leather for Keychains and Small Accessories
Keychains can tolerate somewhat heavier leather because they normally contain fewer stacked layers.
Approximately 4–6 oz works well for many designs, although folded keychains may benefit from lighter leather depending on how many layers overlap.
This is an excellent place to use scraps left from larger projects.
Best Leather for Watch Straps
Watch straps need an interesting combination of strength, comfort, and flexibility.
A strap that is too thin can feel insubstantial. One that is too thick may not bend comfortably around the wrist or fit correctly through the buckle and hardware.
Approximately 3–4 oz leather can provide a useful starting point, although lined straps may use thinner individual layers. Leather-selection references likewise commonly place watch straps around this range.
Always consider the dimensions of your buckle and watch adapters before selecting leather.
Best Leather Thickness for Belts and Heavy Straps
Belts require substantially more structure than wallets.
Approximately 7–9 oz is a common range for a single-layer leather belt, although the desired style and construction can change that considerably.
Heavy straps used on bags, armor, and equipment may fall into a similar range.
If two pieces will be laminated together, lighter leather can be used to achieve the desired finished thickness.
What Leather Should You Use for Leather Armor?
Armor introduces another variable: structure.
A costume bracer does not need the same flexibility as a wallet pocket. A breastplate needs even more structure.
Vegetable-tanned leather is particularly useful because moisture allows it to be shaped and molded. Once dry, appropriately selected veg-tan can retain considerably more form than soft garment leather.
For many cosplay and LARP projects, useful starting ranges are:
Bracers and vambraces: 5–8 oz
Shoulder armor: 6–9 oz
Tassets and leg armor: 6–9 oz
Chest armor: roughly 7–10 oz depending on construction
Armor straps: approximately 5–8 oz
These should not be treated as safety specifications. They are construction guidance for costume, cosplay, Renaissance Faire, and appropriate LARP projects—not certified protective equipment.
Commercial leather-armor patterns likewise vary considerably by design. For example, Tandy Leather recommends 4–5 oz firm-tempered leather for one chest-armor pattern, illustrating why the pattern’s construction matters as much as a generic weight rule.
A Beginner-Friendly Armor Starting Point: Bracers
If you want to learn leather armor construction, you do not need to start with a full cuirass.
Bracers are an excellent first armor project because they require relatively little leather while teaching techniques that transfer directly to larger builds:
- Pattern tracing
- Accurate cutting
- Hole punching
- Edge finishing
- Rivet setting
- Strap installation
- Optional stitching
- Wet forming
- Fitting
Old Line Crafts & Designs’ Wayfarer Bracers were designed around exactly this progression. The pattern recommends 5–8 oz vegetable-tanned leather for the main bracer and overlays, with optional lighter leather or suede for details.
This is also a natural entry point into the Armor for the Commoner collection.
What Leather Should You Use for Spartan-Style Armor?
A Spartan-inspired helmet, pauldrons, greaves, and other structured pieces generally need more body than small everyday-carry goods.
For these projects, vegetable-tanned leather provides another advantage: it can accept tooling, decorative borders, dye, antiquing, and molded shaping.
That allows one basic pattern to produce very different finished appearances.
A maker might choose:
Natural veg-tan + antique finish for an aged historical-fantasy appearance.
Dark brown dye + brass hardware for a rugged campaign-worn look.
Black dye + contrasting edges for a darker fantasy interpretation.
The pattern should always take priority over a generic leather-weight chart because its geometry and assembly method were designed around a particular material range.
Why Leather Thickness Changes Your Hardware Choice
Leather thickness also affects your hardware.
A rivet post needs enough length to pass through every leather layer while leaving enough material to set correctly.
The same principle applies to:
- Chicago screws
- Snaps
- Buckles
- Rivets
- Sam Browne studs
This becomes especially important with armor because an assembly may contain a base layer, decorative overlay, strap, and hardware at the same connection point.
Do not choose hardware before calculating the total assembled thickness.
Thickness Also Changes Your Stitching
Leather thickness affects hand stitching too.
As projects become heavier, you may choose different:
- Thread diameters
- Needle sizes
- Stitch spacing
- Edge offsets
- Hole sizes
A delicate card holder and a heavy leather armor component should not necessarily use identical stitching.
If you are new to hand sewing leather, read our How to Saddle Stitch Leather by Hand: A Complete Beginner’s Guide before beginning a stitched project.
Don’t Forget the Paper Mockup
This is particularly important for wearable leather projects.
Before cutting expensive leather, print the pattern at the specified scale and make a paper or cardstock mockup.
Check:
- Overall dimensions
- Wrist or arm circumference
- Strap positions
- Buckle locations
- Range of movement
- Overlap
- Symmetry
Paper costs pennies.
Good leather does not.
For downloadable patterns, also verify the pattern’s calibration square before assembling the pages.
Buy for the Project, Not for Your Future Workshop
Beginners sometimes think they need an entire side of leather before they can begin.
You usually don’t.
For a first card holder, bracer, keychain, or small accessory, a correctly sized panel or shoulder can be a much more practical purchase.
Choose the project first.
Read its materials list.
Determine the leather weight.
Then buy enough material to complete the project plus some extra for testing.
That extra material is valuable.
Use it to test:
- Dye
- Stitch spacing
- Rivets
- Snaps
- Edge burnishing
- Tooling
- Wet forming
Never make the first strike of a new stamp—or the first application of an unfamiliar dye—on your finished project.
Keep a Leather Scrap Library
One of the easiest ways to become better at choosing leather is to keep labeled scraps.
Write the weight on the flesh side:
3 oz
5 oz
7 oz
9 oz
Over time, you will stop thinking only in numbers.
You’ll be able to pick up a piece of leather and immediately understand how it will behave.
That experience is far more useful than memorizing a chart.
Quick Leather Selection Cheat Sheet
If you’re standing at the workbench wondering where to begin, use this as a starting point:
Wallet pockets: 2–3 oz
Card holders: 3–4 oz
Wallet exteriors: 3–5 oz
Watch straps: 3–4 oz
Keychains: 4–6 oz
General beginner projects: 4–6 oz
Bracers: 5–8 oz
Belts: 7–9 oz
Structured costume armor: approximately 6–10 oz depending on design
Then check the pattern instructions before purchasing your leather.
The Right Leather Makes the Project Easier
Leathercraft becomes much easier when the material is working with the design rather than against it.
The correct leather doesn’t guarantee a perfect project. You still need accurate cutting, good hole placement, consistent stitching or hardware installation, and careful finishing.
But choosing the appropriate leather gives all those skills a better foundation.
If you’re just beginning, start small.
Make a card holder.
Build a keychain.
Try a pair of bracers.
Learn how different leather weights cut, punch, stitch, burnish, and form.
Then move on to the larger project you’ve been thinking about.
At Old Line Crafts & Designs, our downloadable leathercraft patterns are designed to help makers turn those developing skills into finished projects—from practical everyday leather goods to wearable fantasy and medieval-inspired armor.
Start with the right leather. Follow the pattern. Build something of your own.
