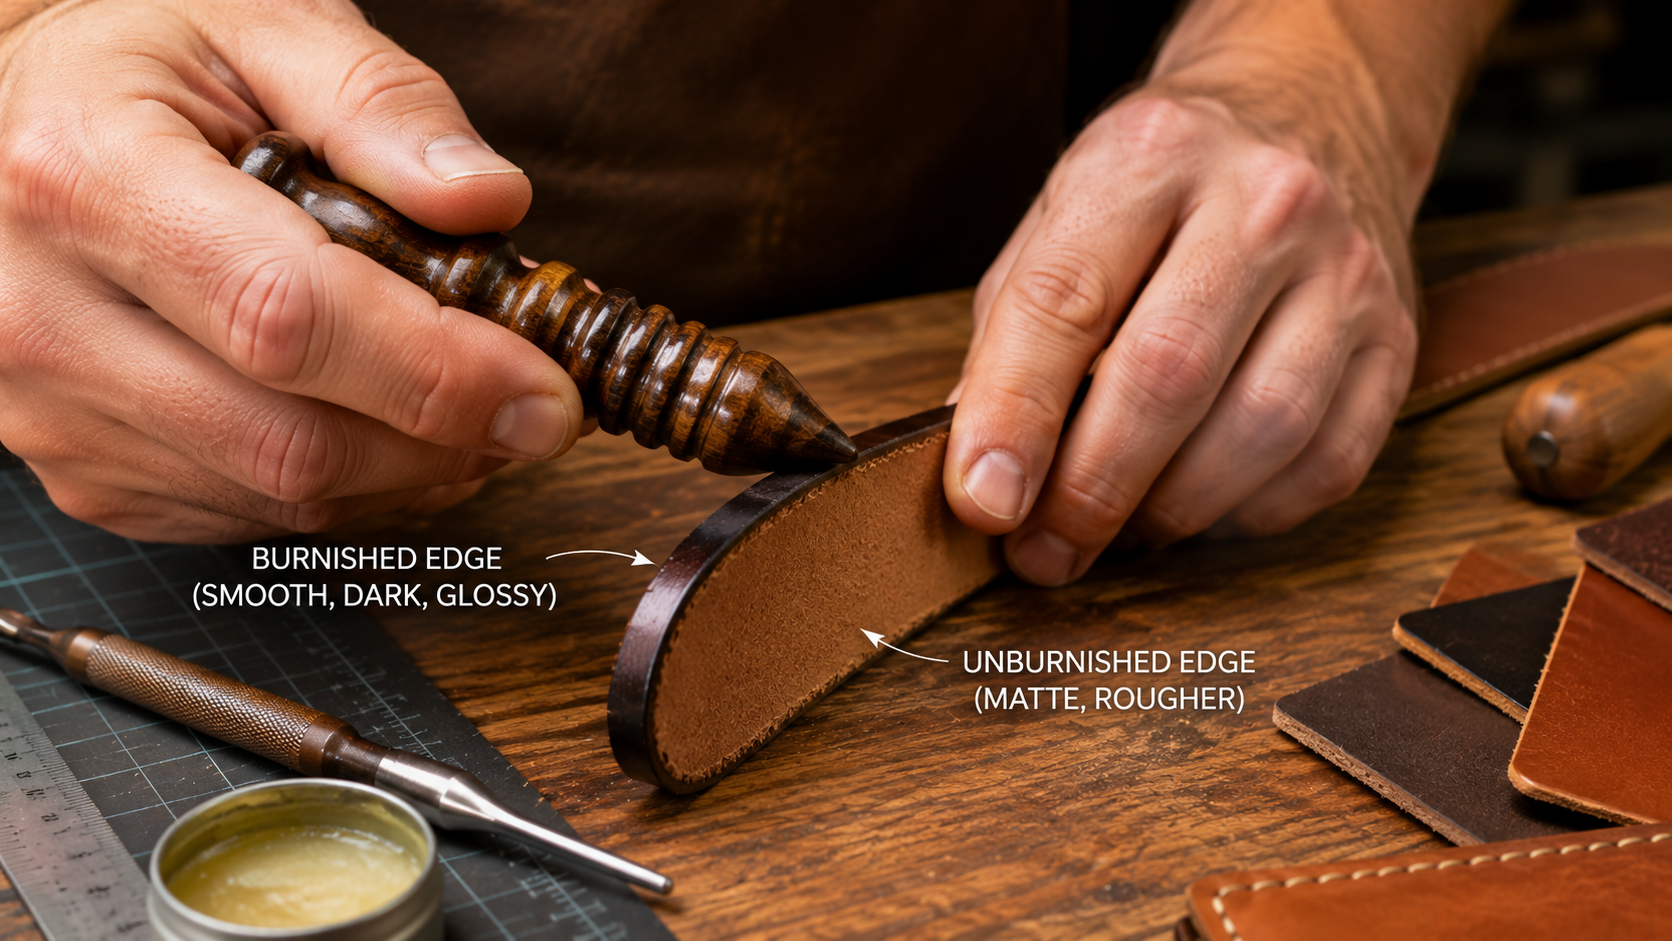
One of the easiest ways to tell the difference between a leather project that looks unfinished and one that looks professionally made is to look at the edges.
Freshly cut leather often has a rough, fibrous edge. Even if the rest of the project is carefully cut, stitched, dyed, and assembled, an unfinished edge can make the entire piece look incomplete.
That is where edge burnishing comes in.
Burnishing is the process of smoothing, compacting, and polishing the exposed edge of leather until it becomes firm, rounded, and often slightly glossy.
It is one of the most useful finishing skills a beginning leatherworker can learn.
At Old Line Crafts & Designs, edge finishing is an important part of creating leather projects that look intentional and finished. This guide explains what burnishing is, why it is done, what you need, and how to burnish leather edges step by step.
What Is Leather Edge Burnishing?
When leather is cut, the exposed edge contains loose fibers.
If you run your finger along a freshly cut piece of vegetable-tanned leather, the edge may feel rough or fuzzy.
Burnishing uses a combination of:
- Moisture or burnishing compound
- Pressure
- Friction
- Repeated rubbing
to compress those fibers together.
As the fibers compact, the edge becomes smoother and more polished.
A properly burnished leather edge often becomes slightly darker than the surrounding leather and develops a smooth, almost sealed appearance.
Why Do Leatherworkers Burnish Edges?
Burnishing is not purely decorative.
It provides several benefits.
It Makes the Project Look Finished
A clean, polished edge creates a noticeable visual difference.
Compare a rough cut edge with a properly beveled and burnished edge and the burnished piece will usually look much more refined.
That can be particularly important on:
- Wallets
- Card holders
- Belts
- Straps
- Keychains
- Sheaths
- Bags
- Leather armor
- Watchbands
- Everyday-carry accessories
It Makes the Edge Feel Better
Leather products are frequently handled.
A smooth edge feels more comfortable against your hands, wrist, clothing, or skin than a rough fibrous edge.
This is particularly important for straps, belts, watchbands, and other items that receive frequent contact.
It Helps Control Loose Fibers
Burnishing compacts the exposed leather fibers rather than leaving them loose.
That gives the edge a cleaner appearance and reduces fuzziness.
It Adds a Professional Detail
Customers may not know the term “burnishing,” but they often notice the difference.
Small finishing details such as clean stitching, polished edges, consistent hardware placement, and smooth curves contribute heavily to the perceived quality of a handmade leather product.
What Types of Leather Can Be Burnished?
Traditional edge burnishing works particularly well with vegetable-tanned leather.
Vegetable-tanned leather contains fibers that respond very well to moisture, pressure, and friction.
Other types of leather may not burnish as easily.
Chrome-tanned leather, very soft leather, and some heavily finished leathers often require different edge-finishing techniques such as edge paint.
If you are unsure, test the process on a scrap from the same piece of leather.
What Tools Do You Need to Burnish Leather?
You do not need expensive equipment.
A basic edge-burnishing setup can be very simple.
Edge Beveler
An edge beveler removes the sharp corner from the top and bottom edges of the leather.
This helps create the rounded profile commonly associated with a finished leather edge.
Sandpaper
Sandpaper helps level and smooth the edge before burnishing.
Useful grits may include approximately:
- 220 grit for correcting uneven edges
- 400 grit for smoothing
- 600 grit or higher for finer finishing
You do not necessarily need every grit. The goal is to gradually make the edge smoother.
Wooden Burnisher
A wooden burnisher, sometimes called a wood slicker, is one of the traditional tools used for edge finishing.
Many have several grooves designed for different leather thicknesses.
The leather edge rides inside the groove while the tool is rubbed rapidly back and forth.
Canvas or Denim
A piece of canvas or denim can also be used to burnish leather.
The texture generates friction while helping polish the surface.
It is inexpensive and remarkably effective.
Burnishing Compound
There are several options.
Common choices include:
- Water
- Gum tragacanth
- Tokonole
- Beeswax
- Saddle soap
- Specialized edge compounds
Different leatherworkers develop their own preferred process.
If you are just beginning, you do not need to purchase every compound available.
Start simple and experiment on scraps.
How to Burnish a Leather Edge
A good burnished edge starts before you ever pick up the burnisher.
The quality of the cut and preparation will affect the final result.
Step 1: Make a Clean Cut
Start with a sharp knife.
The cleaner and straighter the initial cut, the easier the edge will be to finish.
A rough or uneven cut requires more sanding later.
If two or more layers of leather have been glued together, make sure the layers are aligned as closely as possible before edge finishing begins.
Step 2: Level the Edge
If the edge is uneven, sand it until the layers form one consistent surface.
For a glued multi-layer project, this step is especially important.
Sand along the edge rather than aggressively across it.
Your goal is to remove high spots and create a continuous line.
Step 3: Bevel the Corners
Run an appropriately sized edge beveler along the top and bottom corners.
This removes the sharp 90-degree edges.
After both sides are beveled, the edge begins developing a rounded profile.
Do not remove too much material.
Several controlled passes are better than forcing the beveler through the leather.
Step 4: Sand Again
Lightly sand the beveled edge.
This blends the bevel into the center of the leather edge.
As you progress through finer sandpaper, the surface should begin to feel increasingly smooth.
Run your finger over the edge.
If you can still feel major bumps or ridges, continue preparing it before applying burnishing compound.
Step 5: Apply a Small Amount of Moisture or Compound
Apply your chosen burnishing solution sparingly.
The edge should be damp—not soaked.
Too much water or compound can make the leather overly soft or messy.
If you are using water, apply just enough to darken the edge slightly.
If using gum tragacanth, Tokonole, or another compound, follow the manufacturer’s recommendations and use a thin layer.
Step 6: Burnish the Edge
Place the leather edge into an appropriately sized groove on your wooden burnisher.
Rub the tool quickly back and forth along the edge.
You are creating friction.
As you work, you should begin to see and feel the fibers compress.
The edge will gradually become:
- Smoother
- Darker
- Firmer
- More polished
Do not apply excessive force.
Speed and consistent friction are more important than trying to crush the leather.
Step 7: Inspect the Edge
Stop periodically and run a finger over the surface.
If the edge still feels rough, determine whether it needs:
- More burnishing
- Additional compound
- More sanding
- Additional beveling
Do not assume every problem can be solved by simply rubbing harder.
A poor burnish often comes from insufficient preparation rather than insufficient friction.
Step 8: Repeat if Necessary
High-quality edges are often created through several cycles.
For example:
Sand → Apply compound → Burnish → Inspect → Lightly sand → Burnish again
Each pass can improve the surface.
Patience matters more than speed.
Step 9: Finish With Wax
Some leatherworkers apply a small amount of beeswax or another suitable wax after the primary burnishing process.
The edge can then be polished again using canvas, denim, or a burnisher.
This can add additional smoothness and a subtle sheen.
What Should a Finished Burnished Edge Look Like?
There is no requirement that every burnished edge look like polished glass.
The appropriate finish depends on the project.
For many everyday leather goods, a good edge should be:
- Even
- Smooth to the touch
- Free of loose fibers
- Consistently rounded
- Slightly darker than the leather
- Cleanly integrated with the rest of the project
A rugged leather armor project may use a different level of polish than a dress belt or refined wallet.
The edge finish should match the character of the item.
Common Edge Burnishing Mistakes
Trying to Burnish Before Sanding
Burnishing cannot hide a badly uneven edge.
Prepare the surface first.
Using Too Much Water
The goal is to dampen the fibers, not saturate the leather.
Pressing Too Hard
More pressure does not automatically create a better edge.
Excessive force can distort thinner leather.
Using a Groove That Is Too Small
The leather should fit comfortably into the burnisher groove.
If the groove is too narrow, it can damage or deform the edge.
Expecting One Pass to Be Enough
Edge finishing is a process.
Several light passes usually produce better results than one aggressive attempt.
Forgetting Difficult-to-Reach Edges
Think about your assembly order.
Some edges become difficult or impossible to burnish after stitching, riveting, folding, or attaching another component.
Whenever practical, finish those edges before final assembly.
Burnishing Before or After Dyeing?
The sequence varies depending on the project and finishing products.
Many leatherworkers perform most of the sanding and edge preparation first, then apply dye and continue the final burnishing process afterward.
The important thing is consistency.
If you are trying a new dye, edge compound, or finish, test your entire process on scrap leather before using it on the project.
That one habit can prevent many finishing problems.
Practice Edge Burnishing on Scraps
Edge burnishing is an ideal skill to practice because you do not need to risk a finished project.
Take several strips of scrap vegetable-tanned leather.
Try different combinations:
- Water and wood
- Water and canvas
- Gum tragacanth
- Tokonole
- Beeswax
- Different sandpaper grits
Then compare the results.
You will quickly begin to understand how your particular leather responds.
Edge Burnishing and Leather Armor
Although polished edges are often associated with wallets, belts, and small leather goods, edge preparation is also useful when building leather armor.
Helmet panels, shoulder armor, cuirass components, straps, and exposed decorative sections can all benefit from properly finished edges.
For a rugged Spartan-inspired build, you may not want every edge polished to a mirror-like shine.
But removing loose fibers, smoothing the surface, and creating a consistent edge can still improve the finished appearance significantly.
A Small Step That Makes a Big Difference
Leatherworking often comes down to small details.
A clean cut.
A straight stitch.
A properly set rivet.
A carefully rounded corner.
A smooth edge.
None of those details alone makes a project.
Together, they make the project look intentional.
If you are new to leathercraft, do not be discouraged if your first burnished edge is not perfect.
Cut some scrap leather.
Sand it.
Bevel it.
Apply a little moisture.
Start rubbing.
Then compare your first attempt with your fifth.
You will probably see the improvement immediately.
Keep Building Your Leatherworking Skills
At Old Line Crafts & Designs, our downloadable leathercraft patterns are designed to give makers a starting point for learning new skills while creating projects they can actually use, display, or wear.
As you work through larger projects, techniques such as cutting, edge beveling, burnishing, riveting, wet forming, stitching, and finishing become increasingly familiar.
Take your time.
Practice on scrap.
And remember that some of the smallest finishing steps can make the biggest difference in the final piece.
Explore downloadable leathercraft patterns and the Spartan Warrior Armor Series at Old Line Crafts & Designs.
Crafted by hand. Built to last.
