A clean line of hand stitching can completely change the appearance of a leather project.
Even a simple card holder, strap, sheath, pouch, or wallet can look dramatically more refined when the stitching is straight, evenly tensioned, and consistent from beginning to end.
One of the most important hand-stitching techniques in traditional leathercraft is the saddle stitch.
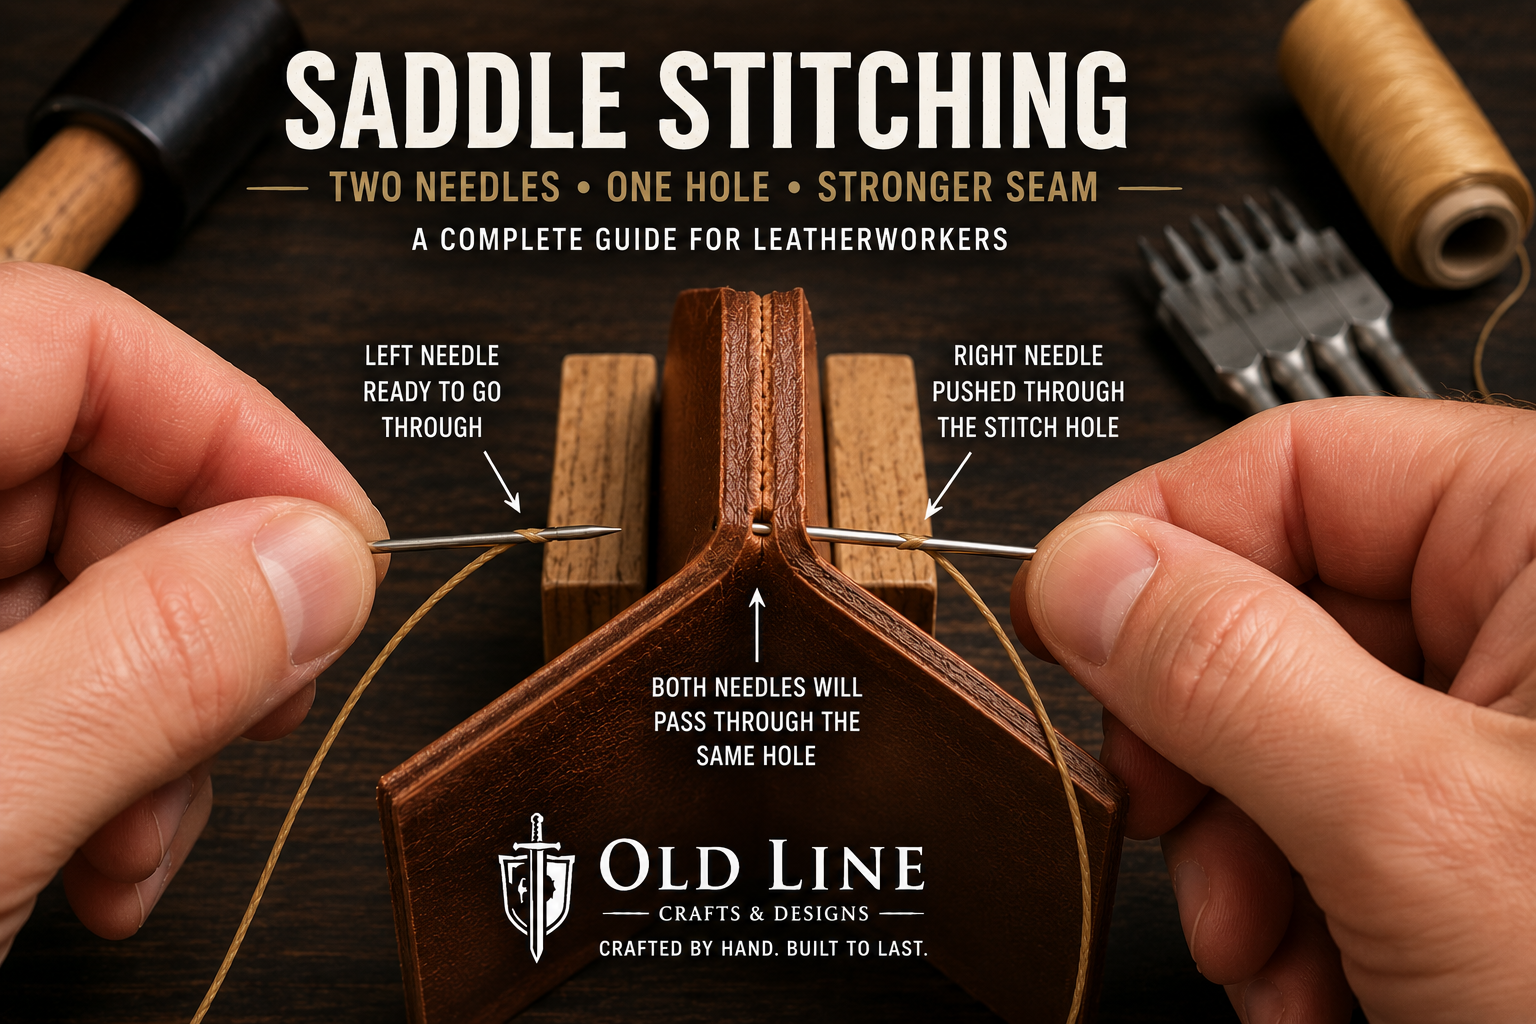
Unlike ordinary sewing, saddle stitching uses one length of thread with a needle on each end. Both needles pass through every stitching hole, creating a strong, attractive seam that is particularly well suited to leather.
It is also a skill that can be learned without a sewing machine.
In this guide, we will cover what saddle stitching is, why leatherworkers use it, the tools and materials you need, how to prepare your leather, how to saddle stitch step by step, how to finish the seam, and how to avoid common beginner mistakes.
What Is Saddle Stitching?
Saddle stitching is a traditional method of hand sewing leather using:
- One continuous length of thread
- Two blunt leatherworking needles
- Pre-punched stitching holes
A needle is attached to each end of the thread.
During stitching, both needles pass through each hole from opposite sides of the leather.
This creates a strong interlocking seam.
The technique was historically associated with saddlery and harness making, but today it is widely used for:
- Wallets
- Card holders
- Belts
- Watch straps
- Bags
- Sheaths
- Keychains
- Pouches
- Leather armor
- Cases
- Everyday-carry accessories
- Decorative leather goods
Saddle stitching is valued both for its strength and for the distinctive angled stitch pattern it can create when done consistently.
Why Use a Saddle Stitch?
There are several reasons leatherworkers continue to use saddle stitching even when sewing machines are available.
Strength
A sewing machine normally creates a lockstitch, which uses two separate threads.
Saddle stitching uses one continuous thread that passes through every hole from both sides.
If one stitch becomes damaged, the seam generally does not immediately unravel in the same manner as some machine-sewn seams can.
That makes saddle stitching particularly useful for items that receive regular use.
Appearance
A well-executed saddle stitch produces a clean, consistent line of stitching.
When properly spaced and tensioned, the stitches can develop the characteristic angled appearance seen on many high-quality handmade leather goods.
Control
Hand stitching allows the leatherworker to control every individual stitch.
You can adjust:
- Tension
- Stitch angle
- Thread placement
- Corners
- Curves
- Difficult-to-reach areas
This is especially helpful on small or unusually shaped leather projects.
No Sewing Machine Required
You can create extremely strong leather seams with relatively simple tools.
For a beginner, that makes saddle stitching one of the most useful leatherworking skills to learn.
Saddle Stitch vs. Machine Stitching
Both methods have advantages.
Machine sewing is significantly faster and makes sense when producing large quantities of leather goods.
Saddle stitching is much slower, but it gives the maker more control and creates the traditional appearance associated with handmade leathercraft.
Neither technique is automatically better for every project.
For small-batch handmade work, however, saddle stitching offers a combination of strength, appearance, and craftsmanship that is difficult to duplicate.
Tools Needed for Saddle Stitching
You do not need a large collection of specialized equipment.
A basic saddle-stitching setup includes the following.
Two Harness Needles
Saddle stitching requires two needles.
Leatherworking harness needles typically have relatively blunt tips because the stitching holes are created before sewing.
The needle should be large enough for your thread to pass through comfortably without being excessively large for the stitching hole.
Leatherworking Thread
Common choices include:
- Waxed polyester
- Waxed nylon
- Linen thread
Waxed thread is particularly convenient for beginners because the wax helps control the thread, reduces fraying, and makes it easier to pull through the leather.
Thread thickness should complement the size of the project and stitching holes.
Fine leather goods generally look better with finer thread.
Heavy straps, armor, sheaths, and rugged projects can accommodate heavier thread.
Stitching Chisels, Pricking Irons, or Punches
Unlike fabric sewing, you normally do not force the needle through solid leather.
The stitching holes are created first.
Common tools include:
Stitching Chisels
Stitching chisels can punch completely through the leather and are very convenient for beginners.
Pricking Irons
Traditional pricking irons generally mark or partially penetrate the leather, with an awl then used to complete the hole.
Many modern leatherworkers also use irons capable of punching completely through thinner leather.
Diamond Chisels
Diamond-shaped stitching chisels are common because they create angled holes that naturally help develop the traditional saddle-stitch appearance.
Stitching Groover or Wing Divider
A stitching line helps keep the holes consistently positioned from the edge.
A wing divider is an excellent tool for marking that line.
A stitching groover can also create a recessed channel in which the thread sits.
Both approaches can work.
The important thing is maintaining a consistent distance from the edge.
Scratch Awl
A scratch awl can be useful for:
- Marking stitch locations
- Opening holes slightly
- Guiding alignment
- Transferring marks
For traditional saddle stitching with pricking irons, a stitching awl may also be used to open each hole as you sew.
Stitching Pony or Stitching Clamp
A stitching pony holds the leather vertically while leaving both hands free.
This is extremely useful because saddle stitching works best when you can control one needle with each hand.
A stitching pony is not absolutely required, but it makes the process significantly easier.
Scissors or Thread Snips
Use sharp scissors or thread snips for cutting thread cleanly.
Lighter for Synthetic Thread
When using synthetic polyester or nylon thread, the ends can often be carefully melted after stitching to help secure them.
Use caution around leather.
The goal is to melt the thread end—not scorch your project.
Natural linen thread should not be finished this way.
How Far From the Edge Should Stitching Be?
There is no single universal measurement.
The correct distance depends on:
- Leather thickness
- Thread size
- Project style
- Strength requirements
- Stitch spacing
For many small leather goods, the stitching line is commonly placed somewhere around 1/8 to 3/16 inch from the edge.
Heavy projects may use a larger offset.
Whatever measurement you choose, consistency is more important than the exact number.
A wandering stitch line is immediately noticeable.
Choosing Stitch Spacing
Stitch spacing is often described as:
- Millimeters between teeth
- Stitches per inch, or SPI
Smaller spacing creates more stitches and generally produces a finer appearance.
Larger spacing creates a more rugged look.
A general starting point might be:
Fine leather goods
Approximately 3.0–3.38 mm
Useful for refined wallets, card holders, and small accessories.
General leathercraft
Approximately 3.5–4.0 mm
A versatile range for many beginner projects.
Heavy or rugged projects
Approximately 4.0–5.0 mm or larger
Useful for heavier straps, bags, sheaths, and some armor applications.
These are guidelines, not rules.
The thread thickness should visually complement the spacing.
How Much Thread Do You Need?
A useful beginner rule is to start with approximately:
4 times the length of the seam
For example, if your seam is 12 inches long:
12 × 4 = approximately 48 inches of thread
Thicker leather, larger stitch spacing, complicated corners, and heavy thread may require more.
It is usually better to have a little extra thread than to run short several stitches before the end.
Preparing Leather for Saddle Stitching
Good stitching begins before the needles come out.
Step 1: Glue the Leather Layers
If two or more leather pieces will be stitched together, adhesive can help prevent them from shifting.
Apply an appropriate leather adhesive and allow it to set according to the manufacturer’s directions.
Do not rely on stitching alone to align badly positioned layers.
Step 2: Trim and Align the Edges
Once the pieces are joined, inspect the edges.
If necessary:
- Trim uneven areas
- Sand the edges
- Make sure the layers align
This is easier to correct before stitching.
Step 3: Mark the Stitching Line
Use a wing divider, stitching groover, or another suitable guide.
Run it consistently along the edge.
This creates the line where the stitching holes will be placed.
Step 4: Punch the Stitching Holes
Position your stitching chisel on the marked line.
Keep the tool vertical.
Strike it with an appropriate mallet on a suitable punching surface.
For long stitching runs, place one or two teeth of the chisel into previously punched holes before creating the next set.
This helps maintain consistent spacing.
Be Careful Around Corners
Corners are where stitching layouts often become uneven.
Before punching everything, look ahead.
You may need to adjust the final few holes slightly so the corner remains visually balanced.
Do not blindly punch until you reach the edge.
Good leatherwork often involves planning the hole layout before committing to it.
Threading Two Needles
Saddle stitching requires a needle on both ends of the same thread.
Cut the required length.
Thread one needle onto each end.
Many leatherworkers lock the thread onto the needle.
One common method is:
- Pass the thread through the needle eye.
- Pierce the thread with the needle a short distance from the end.
- Pull the pierced portion toward the eye.
- Slide it over the needle.
- Pull the thread tight.
This creates a simple lock that helps prevent the needle from falling off while stitching.
Repeat on the opposite end.
How to Saddle Stitch Leather Step by Step
Now you are ready to sew.
For this example, assume the leather is held vertically in a stitching pony.
Step 1: Start at the First Hole
Pass one needle completely through the first hole.
Pull the thread until the length is approximately equal on both sides.
You should now have:
- One needle on the left
- One needle on the right
- Equal thread on both sides
Step 2: Pass the First Needle Through the Next Hole
Take the needle from one side and pass it through the next hole.
Pull most of the thread through, but do not fully tighten yet.
Step 3: Pass the Second Needle Through the Same Hole
Take the opposite needle and pass it through the same hole from the opposite direction.
Be careful.
You do not want the second needle to pierce through the thread that is already inside the hole.
Pull it through carefully.
Step 4: Set the Stitch
Once both needles have passed through the hole, pull the thread outward from both sides.
Use consistent tension.
You want the stitch snug against the leather, but you do not need to pull as hard as possible.
Excessive tension can:
- Distort the leather
- Enlarge the holes
- Create inconsistent stitches
- Cause thin leather to buckle
Consistency is the goal.
Step 5: Repeat the Same Motion
Move to the next hole.
Repeat the exact same sequence:
First needle through → Second needle through → Pull evenly
Consistency matters.
If you alternate which needle goes first or change how the thread sits inside the hole, the angle of your stitches may change.
A good saddle stitch comes from repeating the same motion every time.
Maintaining the Traditional Stitch Angle
One reason saddle stitching looks attractive is the slight diagonal angle of the stitches.
That appearance comes from several factors:
- Angle of the stitching holes
- Direction the needles enter
- Position of the thread inside the hole
- Stitch tension
Choose a consistent sequence and use it for every stitch.
Experienced leatherworkers often develop a rhythm.
Eventually the sequence becomes almost automatic.
Avoid Piercing Your Thread
One of the most common saddle-stitching mistakes happens when the second needle passes through a hole and pierces the thread already inside.
You may suddenly find that the thread will not move freely.
If that happens, do not force it.
Back the needle out and pass it through again beside the thread.
You can also gently pull the first thread toward one side of the hole to make room for the second needle.
How to Finish a Saddle Stitch
You generally do not tie a bulky knot at the end.
Instead, saddle stitching is commonly secured with backstitches.
Step 1: Reach the Final Hole
Complete the normal stitch.
Step 2: Stitch Backward
Instead of continuing forward, return through the previous stitching holes.
Two or three backstitches are common for many projects.
This locks the thread into the existing seam.
Step 3: Trim the Thread
After completing the backstitches, trim both thread ends close to the leather.
If using synthetic thread, carefully melt the tips.
Press the softened ends down gently if necessary.
Do not hold the flame directly against the leather.
Should Saddle Stitches Be Hammered?
Many leatherworkers lightly hammer their completed stitching.
A smooth-faced leatherworking hammer can help:
- Set the stitches into the leather
- Flatten raised thread slightly
- Close stitching holes
- Create a more uniform appearance
Use controlled pressure.
The goal is to set the stitching, not crush or mark the leather.
Stitching Before or After Edge Burnishing?
The answer depends on the project.
If an edge will become difficult to access after stitching, some edge preparation may be completed beforehand.
For layered projects, however, final sanding and edge finishing are often performed after the layers have been glued and stitched together.
A common sequence is:
Glue → Trim → Mark stitch line → Punch → Stitch → Sand edges → Bevel → Burnish
The exact order can change depending on the design.
Stitching Around Curves
Curves require additional planning.
When punching stitching holes around a curve:
- Use shorter irons when necessary
- Rotate gradually
- Avoid forcing a long chisel around a tight radius
- Keep the distance from the edge consistent
Two-tooth stitching chisels can be particularly useful around tight curves.
Saddle Stitching Thick Leather
Heavy leather requires more attention.
You may need:
- Larger stitching holes
- Heavier thread
- Larger needles
- Greater edge distance
- A strong stitching pony
- An awl to help open the holes
Never force a needle aggressively through an undersized hole.
If the hole is too tight, address the hole rather than risking a broken needle or injured hand.
Choosing Thread Color
Thread color changes the personality of a leather project.
Matching Thread
Creates a subtle, refined appearance.
Example:
Brown thread on brown leather.
Contrasting Thread
Makes the stitching part of the design.
Examples:
Cream thread on dark brown leather
Tan thread on black leather
White thread on chestnut leather
Contrasting stitching highlights every stitch—which also means mistakes become more visible.
If you are just beginning, matching or moderately contrasting thread can be more forgiving.
Thread Thickness and Project Style
Thread should complement the leather and stitch spacing.
Heavy thread with very small stitch spacing can look crowded.
Fine thread with extremely large spacing may look too delicate.
The relationship between:
Leather thickness + hole spacing + thread diameter
is more important than any single measurement.
Experiment on scraps.
Common Saddle Stitching Mistakes
Uneven Stitch Tension
If some stitches are pulled tightly and others loosely, the seam will look inconsistent.
Try to use the same amount of tension each time.
Changing Stitch Direction
Changing which needle goes first can alter the appearance of the stitch.
Develop a repeatable sequence.
Punching Crooked Holes
If the stitching chisel is tilted, holes may emerge in different positions on the back.
Keep the tool vertical.
Stitching Too Close to the Edge
Stitching too close to the edge can weaken the seam or cause the leather to tear.
Piercing the Thread
Be aware of the first thread when the second needle enters the hole.
Pulling Too Hard
Saddle stitching requires firm, consistent tension—not maximum strength.
Running Out of Thread
Measure generously.
Extra thread costs far less than restarting an entire seam.
Ignoring the Back Side
Beginners often concentrate exclusively on the front.
Inspect both sides.
Good saddle stitching should look intentional from either direction.
How to Practice Saddle Stitching
You do not need to begin with a wallet.
Cut two strips of scrap vegetable-tanned leather.
Glue them together.
Draw a straight stitch line.
Punch approximately 15–20 holes.
Then practice.
Concentrate on:
- Keeping the same needle sequence
- Maintaining even tension
- Avoiding pierced thread
- Developing a consistent rhythm
- Making both sides look clean
Once you can stitch a straight line consistently, practice:
- Corners
- Curves
- Longer seams
- Thicker leather
- Different stitch spacing
Scrap leather is cheaper than practicing on a finished project.
How Long Does Saddle Stitching Take?
Saddle stitching is slower than machine sewing.
That is part of the process.
Speed develops naturally with experience.
Do not sacrifice stitch quality because you are trying to sew faster.
A leatherworker who creates a consistent seam slowly will usually produce a better result than someone who rushes.
Accuracy first.
Speed later.
Is Saddle Stitching Good for Beginners?
Absolutely.
In fact, saddle stitching is one of the first traditional skills a new leatherworker should learn.
It teaches several useful habits:
- Accurate marking
- Consistent punching
- Thread control
- Stitch tension
- Patience
- Attention to detail
Once you understand the basic movement, the technique becomes surprisingly straightforward.
Saddle Stitching Leather Armor
Not every leather armor design requires stitching.
Many pieces use:
- Rivets
- Chicago screws
- Straps
- Buckles
- Snaps
But saddle stitching can be useful for decorative seams, reinforcement, straps, trim, and certain armor components.
For a rugged armor project, you might choose:
- Heavier thread
- Wider stitch spacing
- Strong contrasting stitching
This creates a different visual character than the finer stitching used on a wallet or card holder.
Internal link suggestion: Link “leather armor” to the Spartan Warrior Armor Pattern Bundle.
Internal link suggestion: Link “armor components” to your Spartan Warrior Armor Series collection page.
Saddle Stitching Small Leather Goods
Saddle stitching is particularly well suited to small leather goods.
Wallets, card holders, keychains, watch straps, and everyday-carry accessories allow the stitching itself to become part of the design.
These projects are also excellent for developing your skills because the stitching runs are shorter and easier to control.
Internal link suggestion: Link “card holders” and “everyday-carry accessories” to relevant Old Line Crafts & Designs products or collections.
A Simple Saddle Stitch Checklist
Before stitching:
✓ Leather pieces aligned
✓ Layers securely glued
✓ Edges trimmed
✓ Stitching line marked
✓ Holes evenly punched
✓ Thread length checked
✓ Two needles attached
✓ Leather securely clamped
While stitching:
✓ Same needle first every time
✓ Avoid piercing the thread
✓ Maintain even tension
✓ Check front and back
✓ Keep a consistent rhythm
When finishing:
✓ Backstitch 2–3 holes
✓ Trim thread ends
✓ Carefully melt synthetic thread if appropriate
✓ Lightly set stitches with a smooth hammer
✓ Complete final edge finishing
The Difference Is Consistency
Saddle stitching is not difficult because it contains dozens of complicated steps.
It is challenging because the same simple steps need to be repeated consistently.
Straight holes.
Even spacing.
Same needle sequence.
Same tension.
Again.
Again.
Again.
That repetition is what creates the clean line of stitching that makes handmade leatherwork distinctive.
Your first stitching line may not be perfect.
Your tenth will probably look considerably better.
Keep your early projects.
A few months later, compare them with your newer work.
The improvement may surprise you.
Learn the Skill, Then Build Something
Leatherworking skills become useful when you apply them to actual projects.
Once you can cut accurately, punch consistent holes, saddle stitch, set hardware, and finish your edges, you have the foundation needed to build a wide range of leather goods.
At Old Line Crafts & Designs, our downloadable leathercraft patterns are designed to help makers turn those skills into finished projects.
Start with scrap leather.
Learn the motion.
Develop consistency.
Then make something you can be proud to say you stitched by hand.
Explore downloadable leathercraft patterns, project guides, and leatherworking resources at Old Line Crafts & Designs.
Crafted by hand. Built to last.
